A top sailor once told me to “lead back on the long tack.” At the time, it sounded good but it I didn’t really understand, and it went to the far reaches of my mind. Fortunately, a short video from the International Sailing Academy (ISA) resurrected the thought. With the video and some wisdom from Roble/Shea Sailing and Terry Hutchinson in Sailing World, we can show why leading back on the long tack often works.
What is “Leading Back on the Long Tack?”
This phrase may not be familiar to all sailors. It applies when a group of boats is on one side of the course and sailing away from the center. “Leading back” means being the first boat to tack back toward the center. The “long tack” is the tack that allows you to sail the furthest without getting to the layline. As you get further away from the center and closer to the layline, the opposite tack becomes progressively longer, compared to the tack you’re on.
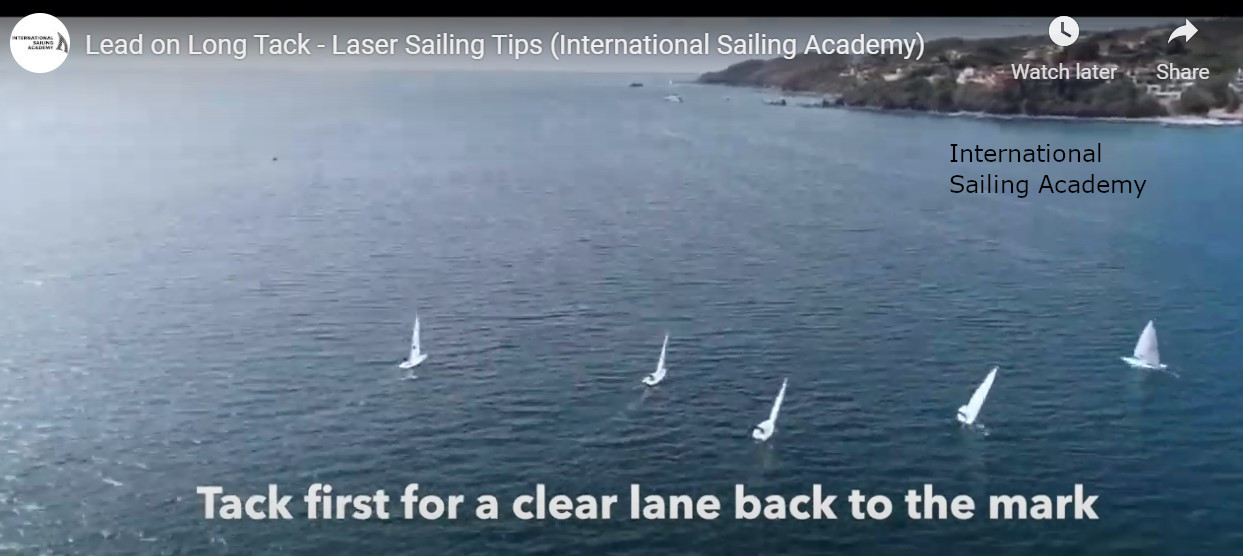
Video Example – International Sailing Academy
Watch this short video of six boats approaching the layline on port tack. Keep track of when they tack back toward the center and how that positions them. Which boats maintain clear air? Which boats still have options to play the shifts without overstanding the mark?
Video Analysis
Unfortunately, the video ends before the boats round the windward mark. Also, we can’t tell the effects of any small shifts or wind velocity variations. However, it’s clear that the boat on the far right puts herself in a great position and makes gains by leading back on the long tack. It’s also clear that the boats delaying longest lose ground.
To analyze the situation further, we developed an animation to roughly duplicate the video.
Let’s break down the animation, using this static view.
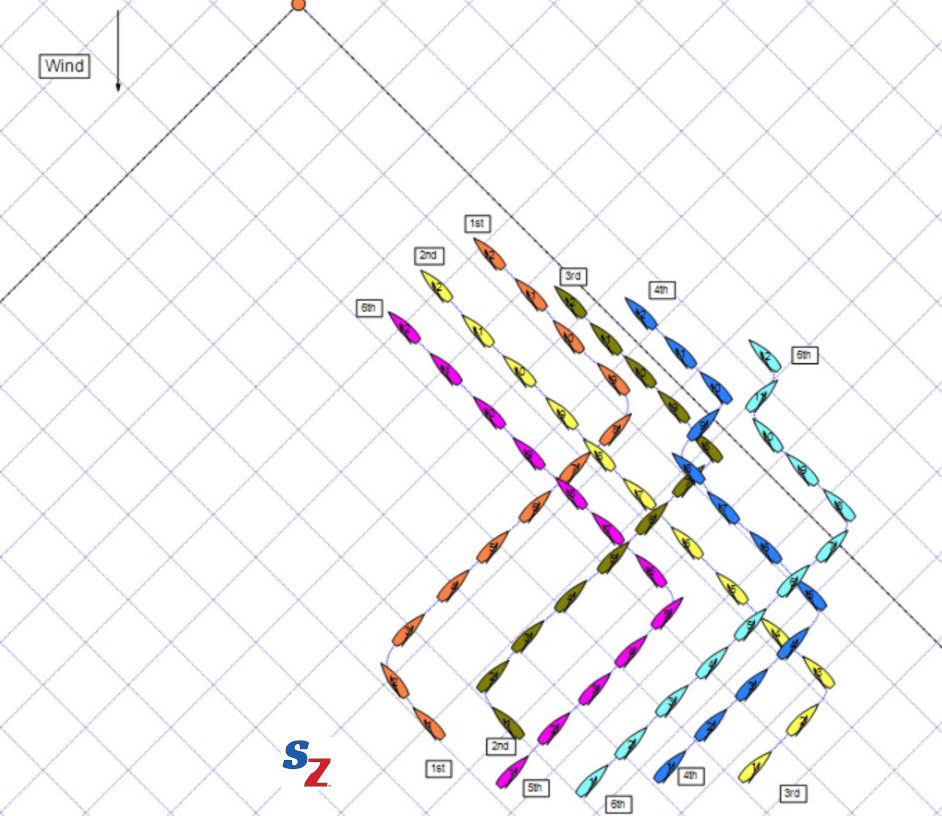
Yellow
Using the ladder rungs, we estimate that Yellow is in 3rd place at the beginning of the scenario. Yellow tacks to starboard first and thus leads back. Note that she tacks well short of the layline. She is on a very long tack on starboard. Even though she is not leading the race, she maintains clear air throughout the scenario. As the boats approach the mark, she still has options to tack on any shifts before reaching the layline. In our estimation, Yellow goes from 3rd place to 2nd place. (Of course, Yellow needs to get to the layline and cross Grey to retain 2nd place.)
Orange
Orange is leading the race as the situation begins. She could have remained on port and crossed all the boats, but she wisely tacked back to starboard just before reaching the layline (she is the third boat to tack back to starboard). She retains her lead and still has options to play the shifts.
Pink
Pink begins slightly behind most of the other boats and would likely sail into a trailing position, with lots of bad air if she kept going on port. Wisely, she tacks early and breaks out into clear air after crossing behind Orange and Grey. In our estimation, Pink goes from 5th to a tie with Blue for 4th, with more options than Blue.
Blue and Grey
These boats delay their tacks until they are close to the layline. This puts them in disturbed air and leaves them with few options. Grey loses ground, sailing lower than Orange between positions 3 and 7 – not sure why. When Grey finally tacks back, she is in Orange’s bad air. Blue makes two extra tacks and probably overstands to get clear air. In our estimation, Grey goes from 2nd to 3rd and Blue goes from 4th to a tie with Pink for 4th, but with fewer options than Pink.
Teal
At the beginning, Teal is slightly behind the other boats. She loses ground by ducking boats and sailing all the way to the layline. After reaching the layline, she makes two extra tacks to get clear air, and likely overstands. She remains in 6th place but is now considerably further behind.
When Does Leading Back on the Long Tack Work Best?
From Upwind Tactics with Roble/Shea Sailing and When to Lead ‘Em Back, Terry Hutchinson in Sailing World, here are three questions to ask:
- How close to the mark and layline are you? If you’re close to the mark, it might be better to continue to the layline. If you’re not close to the mark and are more than 80% of the way to the layline, strongly consider leading back. You need a good reason to keep going.
- What’s the wind doing? Is the pack already in the next shift or more pressure? If so, lead back toward the next shift. Otherwise, consider edging out to get to the advantage that they missed. However, if the puffs and shifts are rapid, edging out may not work.
- How can I manage traffic? Can you cross the pack and tack in a position to keep them in your coverage zone? If so, this is a good play to control the pack, especially when you’re near the top of the course. If not, consider leading back.