

You’ve practiced your starts and studied the course. Then a split ring catches a sheet on the first beat, or a trailer hub cooks on the highway, and the regatta is over before it starts. Most breakdowns are preventable, and you find them in the driveway, not on the race course.
SailZing.com may earn a small commission if you buy through some links in this post, at no extra cost to you. As an Amazon Associate, SailZing earns from qualifying purchases.
In this post, we give you a complete pre-regatta checklist, grouped by area so you can walk around the boat and trailer once and catch everything. Every item is one short line, and many carry a one-line why. It’s class-agnostic, with short MC-Scow and Melges 15 notes where they help (the scow notes cover leeboards and twin rudders), plus one Opti gear box built from the Opti class rules.
For this checklist, we pulled together guidance from:
- McLube product guidance for SailKote and OneDrop
- BoatUS trailering checklists
- NHTSA tire tread and pressure guidance
- U.S. Coast Guard life jacket care and VHF radio check guidance
- 48° North and SAIL magazine rigging checklists
- Harken and Allen block and cam cleat care
- The Racing Rules of Sailing (RRS) 2025-2028, US Sailing edition with prescriptions (rule 1.2 life-saving equipment, rule 78.1 class rules and certificates, rule G1.2 sail identification)
- IODA (International Optimist Dinghy Association): the International Optimist Class Rules 2026 (approved December 18, 2025, in force January 1, 2026), rules 4.1-4.4, for the Opti gear box
- Melges care, tuning and trailer-bunk guidance for the Melges 15 (Melges 15 Care and Maintenance, Melges 15 Tuning Guide, Trailer Bunk Installation)
- North Sails MC Scow Tuning Guide and Quantum Sails Zenda Melges MC Scow Tuning Guide (PDF), for the MC-Scow mast, rig and board notes; each is credited where it’s used
- SailZing.com’s own maintenance articles and videos
Print it: the one-page printable version of this checklist sits at the end of the post. Tape it inside the trailer box.
How to Use This Checklist
- Start two weeks out for anything that needs parts (bearings, tires, line, battens). Do the full walk-around the weekend before.
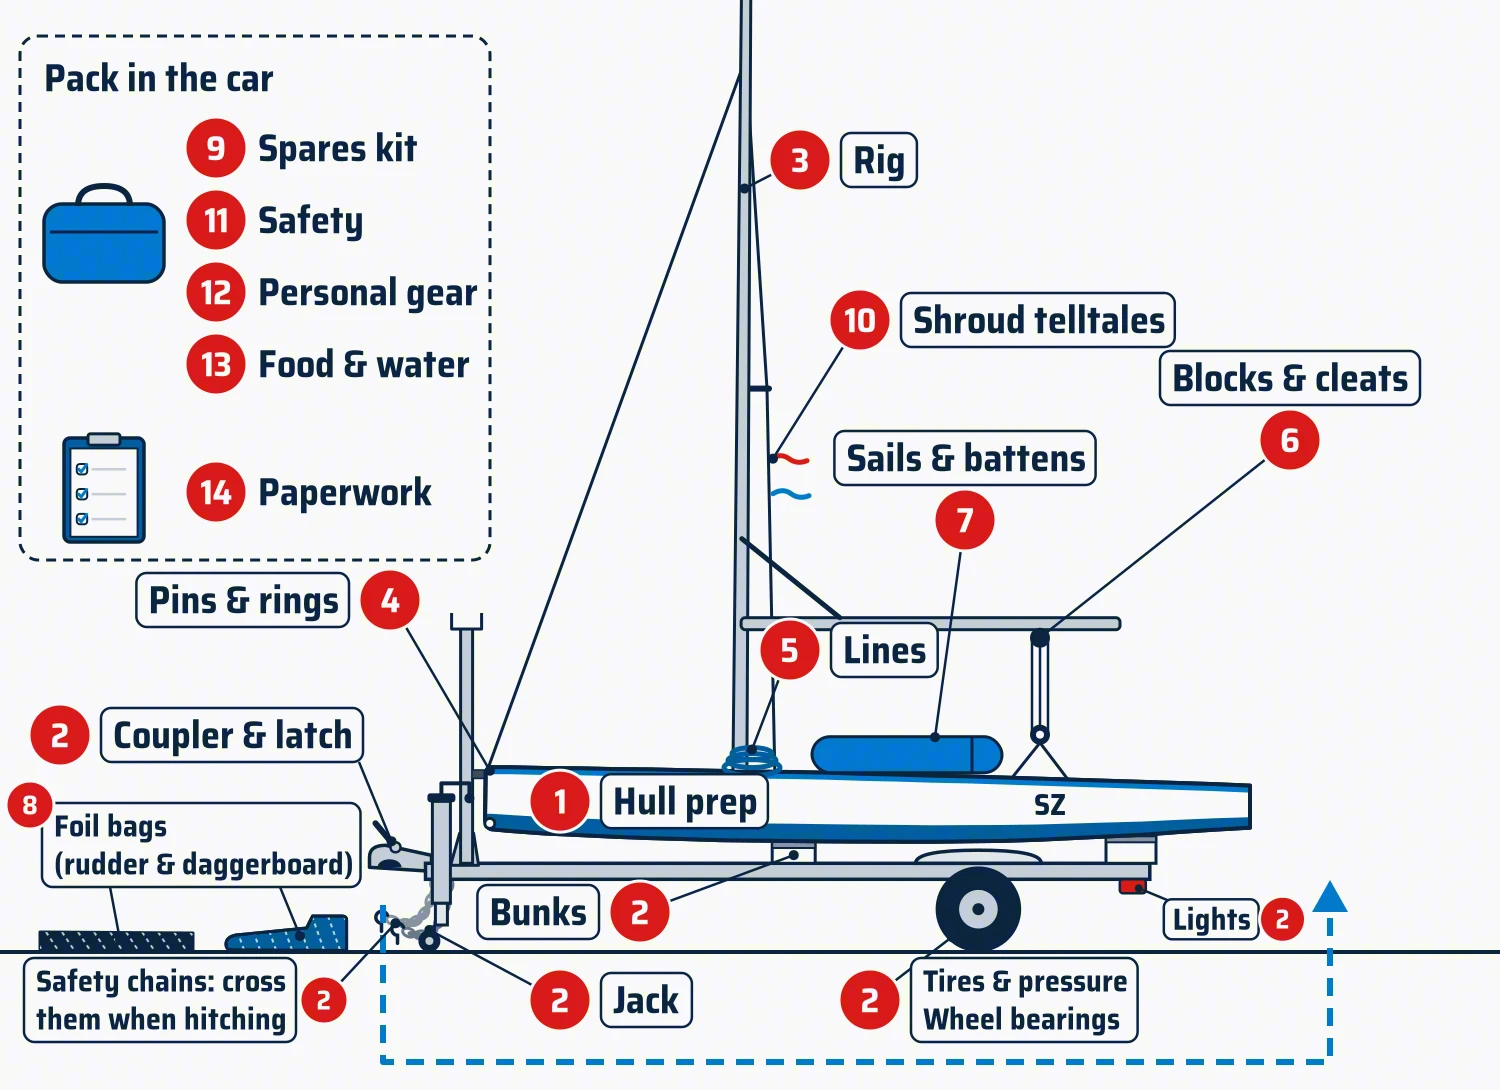
- Walk the boat in one direction. Start at the hitch and finish at the rudder, as in the diagram. You won’t skip a zone.
- Fix it or write it down. If an item fails, fix it now or add it to the spares list.
Terms we use: shrouds (the wires that hold the mast up from the sides), forestay (the wire from the bow to the mast), standing rigging (the wires that stay set), running rigging (the lines you adjust while sailing), blocks (pulleys), pintles and gudgeons (the pins and sockets the rudder hangs on), bunks or bolsters (the padded trailer supports the hull rests on), clevis pin (the pin that joins two fittings), split ring and cotter pin (the wire keepers that stop it backing out), swage (the metal sleeve pressed onto a wire’s end), turnbuckle (the threaded adjuster at the bottom of a shroud), cam cleat (two spring-loaded toothed jaws that grip a line), fairlead (a guide that leads a line), traveler (the track that moves the mainsheet side to side), outhaul, vang/GNAV and cunningham (the main sail-shape controls; on the Melges 15 the vang is inverted, pushing down from the top, and is called the GNAV), first warning signal (the first signal of the starting sequence). More terms: Racing Terms: Glossary for Newer Sailors.
The Checklist: 14 Zones, Hitch to Rudder
#1. Hull Prep
- ☐ Hull prep: wash the bottom and wipe it dry. Why: a clean, smooth bottom is free speed. Every class sets its own limits on sanding, waxing and repairs, and even classes built by Melges differ in how strict they are, so check your own class rules before you sand, wax or repair. Melges 15 class rules aren’t fully informative on hull prep, so in October 2026 we asked Andy Burdick from Melges Performance Sailboats. He advised: “600 grit is the finest ‘powered’ finish. You can use McLube HullKote or StarBrite with teflon when applied by hand. Don’t use a rotary buffer…” Class rules: 2026 Melges 15 Class Rules (effective June 5, 2026, PDF). Rules change. For the latest version, go to Melges15.com and open The Class, then Class Rules, or ask your class measurer, before you sand, wax or repair.
- ☐ Check for nicks, gouges and stress cracks, especially at the bow and where the hull sits on the bunks.
- ☐ Melges 15 tip: fix chips and scratches only as a repair. Fill them with the boat’s original material (the class calls it Permitted Material), such as Melges 15 gelcoat from the Melges store, only on the damaged spot, then finish at 600 grit or coarser (or a Scotch-Brite pad no finer than “very fine”). Why: Melges 15 class rules C.7.1(b) and C.6.1.3(a). A repair that’s substantial, covers more than 5% of the part, or could change its weight, profile (shape), structure or water-tightness needs approval from Melges Performance Sailboats before you start (C.6.1.5(a)(vi)).
- ☐ Melges 15 tip: board bottom plate caulked flush. You may caulk (seal with a flexible filler) the board bottom plate, which the class rules call the hull fairing plate, so it sits flush with the hull, and fill the seam around it. Leave the screw heads uncaulked. Why: Melges 15 class rule C.7.1(c) allows it, and C.7.1(d) bans caulking the screw heads.
- ☐ Drain plugs and inspection ports in and tight.
- ☐ Hull dry inside. Sponge out water and check that it isn’t coming back.
- ☐ Melges 15 tip: drain through the aft drain plug. Pull the plug and lift the bow so the water runs out the back. Why: Melges says to drain the boat this way after every sail. Water left in the hull for long periods can cause osmosis (water soaking into the fiberglass), and the warranty doesn’t cover it (Melges 15 Care and Maintenance). For storage under the boat cover, our Vented Cover for Inspection Port ($45, SailZing Shop) swaps in for the Melges 15 inspection port cover, or any port of the same size and thread, so the inside of the hull can dry out. It’s a vent, not a seal: put the regular cover back before you sail.
- ☐ Optional: a thin coat of wax such as McLube HullKote or Star brite polish with PTFE (Teflon), applied by hand, if your class rules allow it. McLube HullKote. Melges 15 class rules allow waxing (C.7.1(e)), but not lubricants like SailKote on the hull or foils (C.6.1.3(b)). Boats supplied for a regatta can’t be waxed (C.1.3(f)).
#2. Trailer and Towing
- ☐ Hubs lubed. Lucas Oil Marine Grease. Bearings greased, with no grease or oil streaks behind the wheel. Why: BoatUS reports that 21% of TRAILER ASSIST calls are for bearings (Take The Hassles Out Of Trailering). Watch Changing Trailer Wheel Bearings (video).
- ☐ Jack each wheel and spin it, with the trailer hitched, the parking brake set, on level ground and with the axle on a jack stand. Listen for grumbling and feel for side-to-side play. Why: SailZing’s bearings article with John Porter lists both as warning signs of bearing trouble. BIG RED Torin jack stands
- ☐ Hitch latch lubed, and it closes fully on a ball that matches the coupler size. Why: BoatUS says the winch, strap, tongue jack and coupler should all be in working order before you tow (Preparing To Tow A Boat).
- ☐ Coupler pinned or locked so it can’t pop off the ball. Why: BoatUS says to secure the coupler with a pin or lock, and to match ball and coupler: “A 2-inch ball won’t stay on a 1 7/8-inch coupler for long” (Take The Hassles Out Of Trailering).
- ☐ Safety chains crossed under the tongue and hooked to the tow hitch’s chain loops.
- ☐ Lights working: left, right, brake and running lights, with a helper behind the trailer. Clean corroded plug pins.
- ☐ Tires at right pressure, checked cold against the tire label on the trailer’s front left side (by the VIN label), including the spare.
- ☐ Good tread, no sidewall cracks. Why: NHTSA says replace a tire at 2/32 inch of tread; the penny test shows it (NHTSA TireWise).
- ☐ Lug nuts tight.
- ☐ Trailer lock in the tow vehicle, and the key with you. Master Lock 389DAT coupler lock
- ☐ Bolsters clean: bunks and pads free of grit, no torn carpet or loose bolts. Why: grit on the bunks scratches the hull every mile.
- ☐ Melges 15 tip: hull on the molded Melges 15 trailer bunks, set 81 inches apart on brackets that let them pivot, with the tallest end of each bunk forward and the bow 73¾ inches ahead of the center of the front bunk. The hull should touch both bunks evenly, with no single hard spot. Why: Melges says the 81-inch spread is critical for the fit, and badly installed bunks point-load the hull, putting its weight on small spots (Melges 15 Care and Maintenance). Melges also says trailering or storing the boat on bunks it hasn’t authorized voids the warranty (Trailer Bunk Installation).
- ☐ Winch strap, bow line and transom straps snug and not chafed. Use 1-inch cam-buckle straps, not ratchet straps. Why: a ratchet makes it too easy to overtighten. Melges 15: Melges 15 Tie Down Straps (a pair, sized for the boat).
- ☐ Tongue jack up and locked.
- ☐ Mast supports and covers tied down, with nothing loose in the boat. Pad the mast, boom and foils if they ride inside (on the Melges 15, the rudder and daggerboard each ride in their own padded bag). Why: Melges warns that loose, unpadded spars and foils damage the deck’s gelcoat (the glossy outer finish) (Melges 15 Care and Maintenance).
- ☐ Wrap or tape any shackles and loose fittings on the mast so they can’t vibrate loose or chafe the mast on the road.
- ☐ Melges 15 tip: mast on the tower and the transom support, foot covered, boat tied at three points. The mast rides on a slope with its foot (the mast-step end) forward, tied to the trailer’s mast tower, the upright frame above the back of the tow vehicle. Its aft end sits on the Acetal mast support (Acetal is a hard, slippery plastic), which plugs into the transom gudgeons (the rudder fittings), so the rudder comes off for the drive. The rudder and daggerboard each travel in their own padded bag. Tie the mast to the tower, the bow tie-down at the top front of the boat, and the hull straps to the trailer. On the Melges 15 the hull straps take the place of transom straps. Melges supplies them: webbing with a slide-through buckle whose gripper teeth bite the webbing once you pull it snug. Cover the mast’s foot for the tow: Melges sells a mast-foot bag that keeps road grime and bugs out of the mast-step end. Binding the running lines to the mast with Velcro straps (VELCRO Brand ONE-WRAP roll, cut to length) and wrapping the bundle in stretch film (Duck Brand stretch wrap) also works, but the bag is neater. Keep weight in the boat to a minimum: anything that rides inside is padded or bagged so nothing is loose, and heavy gear goes in the car. Why: Melges says never to transport the boat with unpadded gear loose inside, like the mast, boom or foils, because it damages the deck’s gelcoat and lowers resale value. Melges also recommends limiting the weight stored in the boat when it sits on its dolly (Melges 15 Care and Maintenance). Heavy gear in the car is our practical take on both.
- ☐ Spare tire, lug wrench and jack in the tow vehicle.
#3. Rig and Standing Rigging
- ☐ Shrouds and forestay: no broken strands, kinks or bent terminals. Run a rag along each wire; broken strands catch it.
- ☐ Swages and terminals free of cracks and rust. Why: SAIL magazine’s rig inspection says turnbuckles and chainplates “must be closely inspected for cracks, rust, wear or distortion,” and to check for rust or broken wires where each shroud enters its terminal (How to: Inspecting Your Rig).
- ☐ Turnbuckles or shroud adjusters turn, and they’re secured with pins and rings.
- ☐ MC-Scow tip: before you step the mast, check pins, shrouds and spreaders for wear. Put the sidestay turnbuckles in the forward hole of the chainplates. Why: North Sails’ MC Scow Tuning Guide says to “check all of your pins, shrouds and spreaders for wear” and to “Clean and lubricate your sta-master turnbuckles.” Quantum Sails Zenda’s Melges MC Scow Tuning Guide adds: “tape them so that they stay in the set position.”
- ☐ Melges 15 tip: before you step the mast, clean and lube the turnbuckles, with the top and bottom threaded studs screwed in evenly and about ½ inch of thread showing at each end. Attach the sidestays to the forward chainplate pad eyes (the deck loops the shrouds pin to). Why: that’s the starting setup in Melges’ steps for before you step the mast (Melges 15 Tuning Guide).
- ☐ Spreaders tight at the mast and secured to the shrouds, with the tips taped or booted.
- ☐ Mast step and mast base clean, with the step fastened and no cracks.
- ☐ Halyards and halyard locks work (hoist and lock each sail once).
- ☐ Rig tension set to your class tuning guide. See MC Scow Tuning Guide and Speed Tips – UK PS1 Sail, or for the Melges 15, Melges 15 Assembly – A Comprehensive Look and the class builder’s Melges 15 Tuning Guide. Its base setting is 17 on a Loos PT-1 gauge (a gauge that measures wire tension) on the headstay, set by tightening the sidestays (shrouds) evenly. For quick tension changes, our Rig Tension Wrenches for Melges 15 ($150, SailZing Shop) stay on the shrouds and come with pins that lock the turnbuckles between adjustments.
- ☐ MC-Scow tip: set base rake and sidestay tension from your sailmaker’s guide. Rake is how far the mast tips aft. MC guides check it with a 50-foot steel tape hooked to the main halyard: hoist it to the masthead, then read the tape at the stern centerline where the hull and deck meet. North Sails’ MC Scow Tuning Guide, for its Z Max, Magnum and Rocket mainsails: a tape reading of 28 ft 3 in, then sidestays to 15 on a Loos tension gauge (North’s tool list names the P-1 model) and two full turns off each side as the base setting. Quantum Sails Zenda’s Melges MC Scow Tuning Guide, for its own mainsails: also 28 ft 3 in, with the sidestays taut but set “with your fingers, not a wrench.” Why: each guide is written for that loft’s sails, so use the one that matches your main.
- ☐ Melges 15 tip: ease the rig after each day of sailing. First back the turnbuckles off to the light-air setting, then release the rig tensioner (the tensioning tool that comes with new boats). Never over-tighten the tensioner. Why: Melges says a rig left under tension, or a tensioner cranked too tight, damages the hull’s structure over time (Melges 15 Care and Maintenance).
#4. Pins, Rings and Shackles
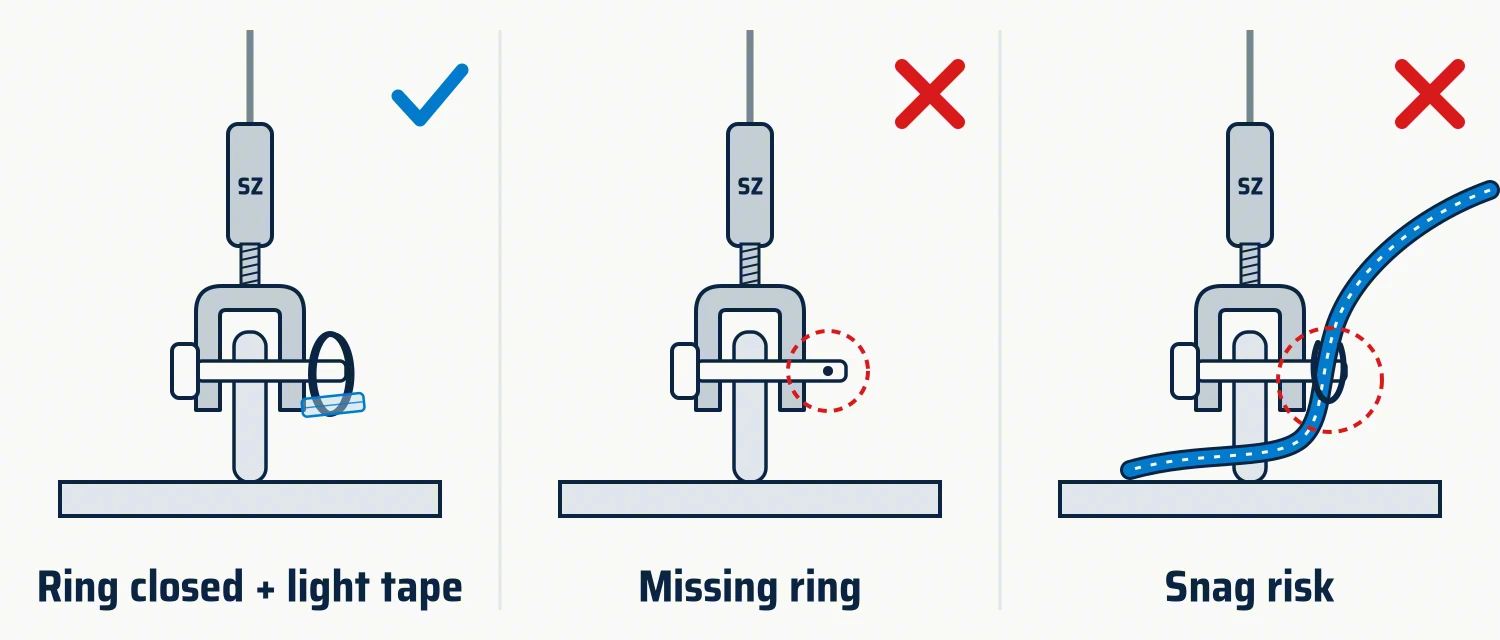
- ☐ Every clevis pin has its ring or cotter pin. Count them at the mast base, forestay, shrouds, boom and rudder.
- ☐ Rings closed or lightly taped. Why: 48° North notes split rings should be closed or lightly taped so sheets can’t catch them (Race Ready Rigging Checklist).
- ☐ Tape lightly, and look under old tape. Why: SAIL notes that tightly taped turnbuckles can corrode underneath, so unwrap them and check for discoloration (How to: Inspecting Your Rig). 48° North adds: use tape sparingly, and rig tape should let water drain (Race Ready Rigging Checklist).
- ☐ Shackles tight, with non-locking shackles moused (wired shut). Seizing wire is best; a cable tie works in a pinch.
- ☐ Replace bent or worn pins and old rings before the event.
#5. Running Rigging and Lines
- ☐ Lines frayed? Check the cover where each line sits in a cleat, block or fairlead.
- ☐ Sheets, halyards and control lines: no core showing, no stiff or glazed spots.
- ☐ Line ends whipped or melted, with no unravelled tails.
- ☐ Outhaul, vang/GNAV and cunningham run their full range. See Prevent Outhaul Failures – Six Tips.
- ☐ Shock cord and retrievers still stretch and pull back.
- ☐ Knots and stopper knots in place on sheets and control lines.
#6. Blocks and Cleats
- ☐ Blocks lubed with McLube and spinning freely? Why: McLube makes OneDrop as its ball-bearing conditioner, so the balls roll instead of skid. Harken’s Tech Team also recommends just one drop of OneDrop in a block’s ball-bearing race (Harken). SailKote goes on sliding parts in 1–2 thin coats on clean, dry surfaces (SailKote application guide).
- ☐ Clean the cams and teeth with soap and water. Why: Harken’s care answer for its Cam-Matic cleats is regular cleaning: a little liquid dish soap, worked around, then flushed clean with water (Harken). Allen adds a fresh-water rinse after every sail, opening and closing the jaws by hand to flush out grit (Allen).
- ☐ No lube on cam cleats unless your cleat maker’s care guide calls for it, and never on the teeth. Why: Allen says never to lubricate its cam cleats: lube can make the ball bearings skid instead of roll, and grit and sand stick to it (Allen).
- ☐ Check the teeth for grooves worn by pulling the line through. Worn teeth slip, so replace the cams. Why: Allen notes the grooves where the line rests wear down from friction, and worn jaws struggle to grip the line (Allen).
- ☐ Cam springs snap the jaws shut when you open them by hand. Why: Allen says jaws that don’t close quickly, or at all, mean a broken spring (Allen).
- ☐ Block shackles, swivels and stand-up springs move freely.
- ☐ Screws on every fitting tight, with no cracks around the bases.
- ☐ Traveler car rolls the full track.
Why the difference? McLube makes OneDrop to keep block bearings rolling, and Allen says never to lubricate its cam cleats. We follow the cleat maker on cleats: clean and rinse them, and skip the lube unless the maker’s own care guide calls for it.
#7. Sails and Battens
- ☐ Check the spinnaker for holes, if your boat carries one.
- ☐ Seams, leech and corners: no open stitching, tears or chafe spots.
- ☐ Battens all present, not cracked, and tight in their pockets.
- ☐ Sail numbers legible. Why: rule G1.2(a) says “the letters and numbers identifying the boat shall be clearly legible when the sail is set.” Rule G1 is written for World Sailing classes, but in the US, a US Sailing prescription to rule G2 applies it to boats that aren’t in a World Sailing class, such as scows and the Melges 15, “unless otherwise stated in her class rules” (US Sailing Prescriptions). Check your class rules too.
- ☐ Sail telltales on, untangled and readable. Why: McLube says SailKote keeps telltales from sticking to a wet sail.
- ☐ Sails folded or rolled dry, in their bags, with the right sails for the event. No wet sails left in the boat. Why: Melges says not to store wet sails in the boat (Melges 15 Care and Maintenance).
#8. Foils: Rudder, Centerboard, Daggerboard or Leeboards
- ☐ Leading and trailing edges free of nicks. Fill and sand nicks before the event, within your class rules. Melges 15 class rules: wet-sand the daggerboard and rudder to 600 grit, no finer, to take out scratches. Keep their chord width (front-to-back width) and shape as built, and don’t fill or fair (smooth over) the seam where the foil meets its end cap (C.8.1(e), (f) and (h)).
- ☐ Pintles and gudgeons tight, with no slop.
- ☐ Melges 15 tip: shim tape on the rudder to take out slop is fine; never shim the daggerboard or its board box. Shim tape is thin tape that fills a small gap so a part can’t wobble. Why: Melges 15 class rules C.6.1.3(x) and C.8.1(g).
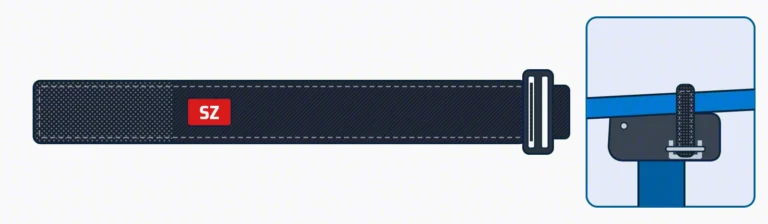
- ☐ Melges 15 tip: rudder pivot bolt tight, and the tiller hold-down strap still grips. The strap is hook-and-loop (Velcro-type) with a buckle. It loops through the fitting on the rudder head and wraps over the tiller, holding the tiller to the rudder head, up for shallow water or down for racing. Check that the hook and loop still grab firmly and that the strap holds the tiller both up and down. A new strap looks crisp and grabs hard. Replace it when the loop side is fuzzed or matted, or when it slips. Hook-and-loop straps with a buckle are inexpensive, and sailors use them to hold the tiller up or down on the rudder head, so buy a pack and keep spares: hook-and-loop straps with buckle (about $7 for a 10-pack). Melges.com also sells them, so check theirs out if you prefer. Why: Melges says a loose pivot bolt (the bolt the blade swings on) lets the blade twist until its fitting hits the rudder head. A tiller that pops up in heavy wind can let the rudder kick up and damage the rudder, the tiller or the transom gudgeons (Melges 15 Care and Maintenance).

- ☐ Rudder retaining clip or lock works. Why: it keeps the rudder on the boat after a capsize.
- ☐ Tiller, tiller extension and universal joint secure.
- ☐ Centerboard or daggerboard moves freely and holds where you set it.
- ☐ Melges 15 tip: daggerboard retaining line tied to the boat and the board, and the board’s shock cord over the board around its trailing edge. The retaining line keeps the board attached to the boat; both it and the shock cord must be at least 5 mm thick. Why: Melges 15 class rule C.6.1.3(n) requires the retaining line when racing, C.6.1.3(m) requires the shock cord in place whenever you sail, and C.6.1.4(b)(vii) and (viii) set the 5 mm minimum.
- ☐ Scows: both leeboards and both rudders checked, with up and down lines in good shape. See MC Scow Boards Full Down Position.
- ☐ MC-Scow tip: board angles marked on the deck. With the boat on its side, check that each leeboard can’t hit the front of its case, then measure the full-down angle with a protractor; North suggests 103 degrees for light air (North’s number for its own sails). Mark both sides on the deck, plus a downwind mark with the board pulled up until its aft knuckle just tucks into the hull. Why: North Sails’ MC Scow Tuning Guide says the marks “ensure that the board is even from tack to tack.”
- ☐ Foils in their padded bags. If they ride in the boat, they’re bagged and secured, never loose. Why: the bags protect the edges you just checked. Melges 15: the rudder and daggerboard each have their own padded bag.
#9. Tools and Spares Kit
- ☐ Sail tape for repairs. Nautos PSP Dacron sail tape, red/navy/white
- ☐ Rigging or electrical tape. Scotch Super 33+ vinyl electrical tape
- ☐ Spare clevis pins, rings, cotter pins and a shackle or two. Seachoice stainless cotter ring kit (rings only; pins sold separately)
- ☐ Spare line long enough to replace your longest control line.
- ☐ Cable ties and seizing wire. TR Industrial UV-resistant cable ties
- ☐ Multi-tool or pliers, screwdrivers and a small wrench.
- ☐ McLube for blocks and sliding parts. Melges 15 class rules: lube goes on fittings, the mast and the sail only, never the hull or foils (C.6.1.3(b)). McLube Sailkote dry lubricant
- ☐ Tire pressure gauge. JACO ElitePro tire pressure gauge
- ☐ Spare trailer light bulbs or fuse. SYLVANIA 1157 trailer bulbs
- ☐ A cordless vacuum cleans sand and debris out of the boat at the venue. Two options: a DEWALT cordless wet/dry vac, which runs on DEWALT 20V batteries (handy if you already own them), or a slim, light handheld vac for dry use only.
- ☐ A soft washing pad on a long extendable pole lets you clean the bottom of the boat without crawling under it. Keep it non-abrasive: no scouring or polishing pads.
#10. Shroud Telltales: Fresh and Readable
- ☐ Shroud telltales fresh, free-spinning and readable. Replace faded or frayed ones. Why: you read the wind from them before your first tack. Our own SailZing StayTales™ are made in Sarasota, FL, and come off for trailering.
- ☐ Telltales off the shrouds for the drive, then back on at the venue.
#11. Safety
- ☐ VHF radio charged and working well. Icom IC-M85 handheld VHF. Do a voice radio check on Channel 9, not 16. Why: the U.S. Coast Guard asks boaters to use Channel 9 for voice radio checks (USCG Navigation Center).
- ☐ Life jackets: one per person, the right size, with no rips, torn straps or broken buckles. Why: the Coast Guard says a PFD (personal flotation device, i.e., a life jacket) must be in serviceable condition (USCG PFD care).
- ☐ Inflatable PFDs armed, with a full cartridge and all status indicators showing properly armed (your maker’s manual shows what that looks like). Why: the Coast Guard counts an inflatable as serviceable only with “a full inflation medium cartridge and all status indicators showing that the inflation mechanism is properly armed” (USCG PFD care).
- ☐ Whistle on each life jacket. LuxoGear emergency whistle
- ☐ Knife you can reach with one hand. Options: a Leatherman Skeletool multi-tool with a carabiner clip, a Myerchin rigging knife with a marlinspike, or scissors with micro-serrated blades that grip Dyneema fibers so the line cuts cleanly.
- ☐ Paddle, bailer or bucket, if your class rules require them. Attwood 11830-2 bailer safety kit (bailer, whistle, flashlight and line). Opti sailors: see the Opti gear box below, and the Nautos Big Orange bailer and the Nautos Opti one-handed paddle.
- ☐ Check the notice of race (NoR) and class rules for required gear. Why: rule 1.2 (Life-Saving Equipment and Personal Flotation Devices) says: “A boat shall carry adequate life-saving equipment for all persons on board, including one item ready for immediate use, unless her class rules make some other provision. Each competitor is individually responsible for wearing a personal flotation device adequate for the conditions.” The NoR and class rules can add to this, so read both.
Opti Gear Box: What the Opti Class Rules Require
For Opti sailors only. Sailing another class? Skip ahead to #12. Personal Gear and check your own class rules and the NoR.
These lines come from the International Optimist Class Rules 2026 (IODA, approved December 18, 2025, in force January 1, 2026), rules 4.1 to 4.4. Rules 4.1 and 4.3 apply while racing. Class rules are hard limits, not tips. Class rule numbers are in parentheses.
- ☐ One sailor aboard. “Only one person shall be on board while racing.” (4.1)
- ☐ Life jacket on and fastened. The sailor wears a PFD that meets at least ISO 12402-5 (Level 50), the international standard for buoyancy aids, or an equivalent, with every fastening the maker supplied done up as intended. (4.2(a))
- ☐ Whistle tied to the PFD. It stays on the PFD even if a close-fitting bib or vest goes over the top, and the sailor can reach it easily. (4.2(a))
- ☐ Clothing and gear: 8 kg (17.6 lb) maximum. Everything worn or carried, not counting footwear, must not be able to weigh more than 8 kg when weighed as RRS Appendix H (Weighing Clothing and Equipment) describes: “After being saturated in fresh water the items shall be allowed to drain freely for one minute before being weighed.” (4.2(b))
- ☐ Hiking pants legal. They aren’t attached to the boat, and no stiffening in them can extend below the knee joint. (4.2(c))
- ☐ Bailer tied on. Each bailer is tied to the hull with its own lanyard or elastic cord, and at least one holds 1 liter (about 1 quart) or more. (4.3(a))
- ☐ Painter (the bow line for towing or tying up) aboard. One piece of rope that floats, at least 5 mm (just over 3/16 in) thick and 8 m (about 26 ft) long, tied securely to the mast thwart (the cross-bench that holds the mast) or the mast step. (4.3(b))
- ☐ Paddle tied on. Wood and/or plastic, at least 200 g (about 7 oz), corners rounded to at least a 5 mm radius, and a blade big enough to hold a 200 mm x 130 mm (about 7.9 x 5.1 in) rectangle. It’s tied to the hull with a lanyard or elastic cord. (4.3(c))
- ☐ Anchor only if the sailing instructions call for one. (4.4)
Check the current rules. IODA updates the Opti class rules often, and the notice of race can add more. Before each season, open the IODA Class Rules page and confirm the edition marked “current version.”
#12. Personal Gear
- ☐ Sailing clothes for the forecast, plus a dry layer for after.
- ☐ Boots, gloves and hiking pants or shorts.
- ☐ Hat, sunglasses with a strap, and sunscreen.
- ☐ Watch or timer, charged.
- ☐ Dry bag, towel and a change of clothes. A dry duffel (40, 60 or 80 L) keeps everything together.
- ☐ Packing tip: squeeze-down bags inside your duffel. Sort small gear into squeeze-down bags: one for microfiber cleaning and drying cloths, one for tie-downs, hook-and-loop cinch straps and short lines, one for a clean, dry spray top and pants. Press the air out and they pack small. Pick cinch straps with hook-and-loop along the whole strap, so they adjust to any size; fixed-length straps come in kits of sizes, and none is ever quite right.
#13. Food and Water
- ☐ Water bottles, filled and on the boat.
- ☐ Electrolyte drink and energy bars or snacks. Why: hydration, electrolyte balance and glucose all matter on the water. See Sailing and Hydration – Three Key Issues.
- ☐ Lunch and a cooler for the day.
#14. Paperwork
- ☐ Entry confirmed and fees paid.
- ☐ Class membership current.
- ☐ Measurement certificate valid, if your class uses one. Why: rule 78.1 says: “While a boat is racing, her owner and any other person in charge shall ensure that the boat is maintained to comply with her class rules and that her measurement or rating certificate, if any, remains valid.”
- ☐ Boat and trailer registration current, with plates on the trailer.
- ☐ Insurance proof, if the NoR asks for it.
- ☐ Sail number matches your entry.
- ☐ NoR and sailing instructions (SIs) read, with the first warning signal time noted.
- ☐ Renting or chartering a boat? Ask first. There may be limits on what you can change or fix on it. Melges 15 class rule C.1.3: on boats supplied for a regatta, changes to the hull, spars and fittings are barred, and repairs need the race committee’s OK.
Start With These Three
You can’t check everything the night before, so start with the items that end regattas:
- Trailer hubs and tires. Without them, you don’t get there.
- Pins, rings and shackles. One missing ring can drop the rig.
- Rudder and pintles. No steering, no racing.
Then work through the rest of the list and pack the spares kit.
Printable Checklist
Download the one-page printable pre-regatta checklist (PDF) and keep a copy in your trailer box.

Related Content
- Prevent Breakdowns – Top Tips, Updated
- Changing Trailer Wheel Bearings – with John Porter’s video walkthrough
- Maintenance Tips and Myths for Cleaning and Storage
- Seven Depowering Tools – Sail Controls, Rig Tuning, Boat Trim
- Sailing and Hydration – Three Key Issues
- Preparing To Tow A Boat – BoatUS
- Take The Hassles Out Of Trailering – BoatUS
- Tire Safety (TireWise) – NHTSA
- Race Ready Rigging Checklist – 48° North
- How to: Inspecting Your Rig – SAIL
- SailKote and OneDrop – McLube product guidance
- Complementary Hardware Q&A (cam cleat care) – Harken
- Maintenance and Care of Cam Cleats – Allen
- Melges 15 Care and Maintenance – Melges
- Melges 15 Class Rules (effective June 5, 2026, PDF) – Melges 15 Class
- International Optimist Class Rules (current edition) – IODA
- Melges 15 Tuning Guide – Melges
- Trailer Bunk Installation – Melges
- MC Scow Tuning Guide – North Sails
- Melges MC Scow Tuning Guide – Quantum Sails Zenda
Midwest class associations
Check your class association for the current class rules before you sand, wax or repair.
- E-Scow – National Class E Scow Association (Scantling Rules and rule-change history on the Governing Documents page)
- C-Scow – National C Scow Sailing Association (Scantling Rules on the Bylaws page)
- MC-Scow – MC Sailing Association (class rules are for members only; log in to view)
- Melges 15 – Melges 15 Class
- X-Boat – X-Boat class (ILYA)