If you want to maximize performance and minimize frustration, it pays to learn the best techniques to tie an Optimist sail. We pulled tips from manufacturer’s tuning guides, books, and online sources to make the process easier. We added performance and rules notes to highlight the critical steps.
Objectives
When we tie an Optimist sail, we’re trying to accomplish several objectives.
- Stay within class rules
- Tweak the sail shape for the existing wind conditions and the sailor’s weight and ability
- Make sure the sail ties don’t loosen on the water
The steps in this article assume you are tying the sail for the first time, and that you may want to de-rig and re-rig the sail periodically for travel.
Preparation
Make sure you have sail ties made of Vectran or Dyneema. These may be included with your boat or your new sail. It’s essential to have extra sail ties available. Here’s a table of what you need and sources.
| Purpose | Diameter | Length | Min. quantity |
| Luff and foot | 1.2 mm | 17″ | 12 |
| Corners (clew, tack, head) | 3 mm | 22″ | 5 |
You can get pre-cut sail tie kits from Colie Sails. You can also buy small spools of 1.2 mm and 3 mm Vectran from West Coast Sailing.
Tie the Foot of the Sail to the Boom
You can start by tying the sail to the boom before you attach the boom to the mast. Tie at the clew, along the foot, and at the tack, using these steps.
Performance note: Since the outhaul takes care of adjusting the foot of the sail, you don’t need to adjust the boom ties for different wind conditions. Therefore, you can tie the the foot of the sail to the boom once and leave it for the season.
Tie the clew
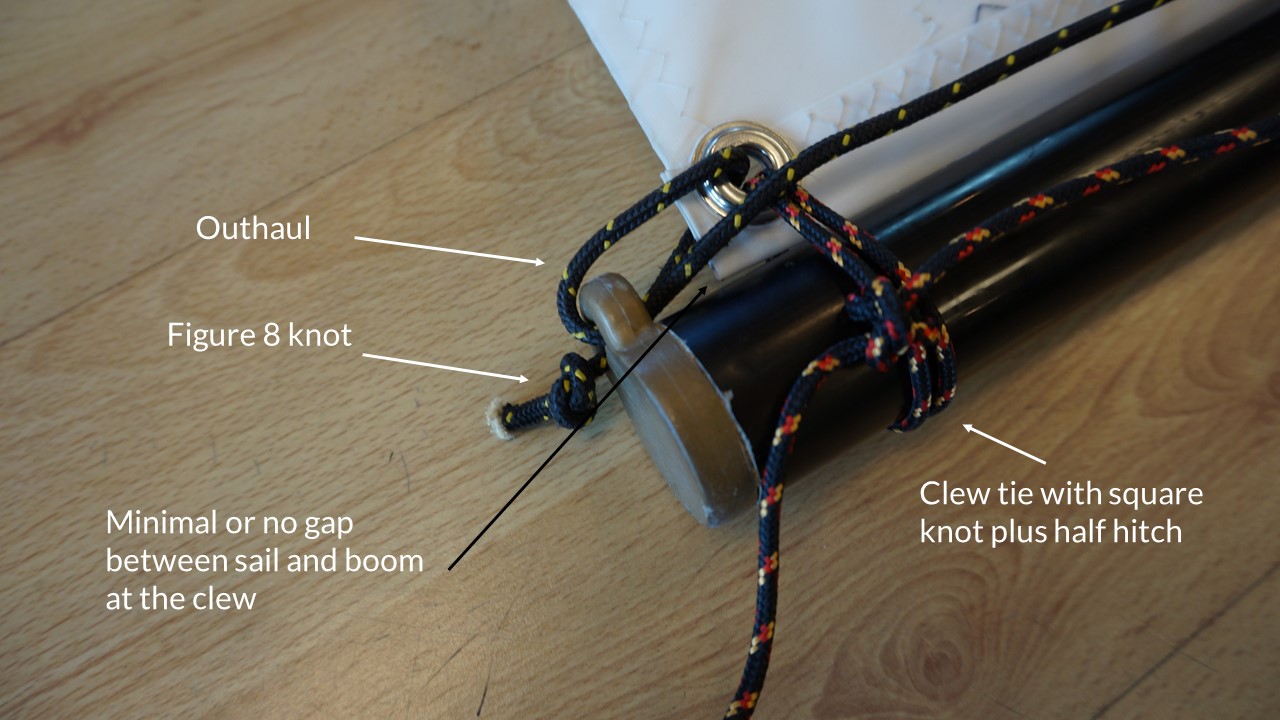
The clew is the aft end of the sail. There are two lines to attach: the outhaul and the clew tie. Do the outhaul first.
Outhaul
- Tie a figure eight knot in the end of the outhaul line and thread it through the boom end fitting.
- Pass the line through the clew grommet and then back again through the boom end fitting.
- Cleat the other end of the outhaul line loosely in the boom cleat.
Clew tie
- Thread a corner tie (3mm) through the clew grommet and around the boom, wrapping it twice around.
- Tie a square knot in the free ends so that the sail just touches the top of the boom, but does not overlap.
- Set the square knot by pulling both ends tightly and pulling up on the clew. Make sure there is no gap between the sail and the boom. Re-adjust if needed.
- Make sure the clew is not too tight so that it is free to slide along the top of the boom as you pull the outhaul line.
- Performance note: If the clew lifts off the boom, this loosens the leech of the sail, which reduces the ability to point.
Tie the foot
- Use 1.2 mm ties to tie the foot of the sail to the boom.
- Double wrap the ties through the grommets and around the boom. Double wraps make the gap between sail and boom easier to adjust.
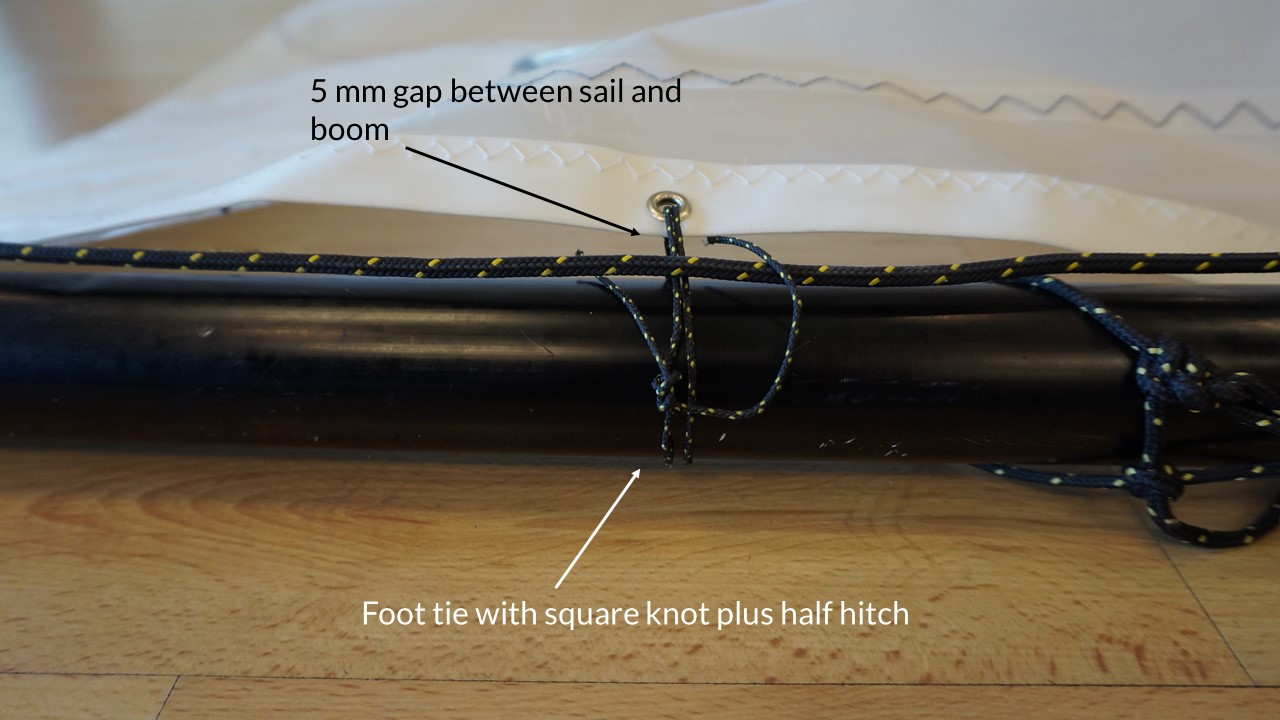
- Tie the free ends (square knot) to make a 5 mm gap between the sail and the boom.
- Performance note: The Opti sail is cut in a curve along the foot. This gives it a pocket when it is tied to the straight boom. The pocket produces lift as the air flows over it. The 5 mm gap lets the sail pocket flip from one side to the other.
- Rules note: The maximum gap allowed between the boom and sail is 10 mm.
- Set the square knots by pulling tightly on both ends and pulling up on the sail.
- For additional security, add a half hitch to one end of each square knot.
Tie the tack
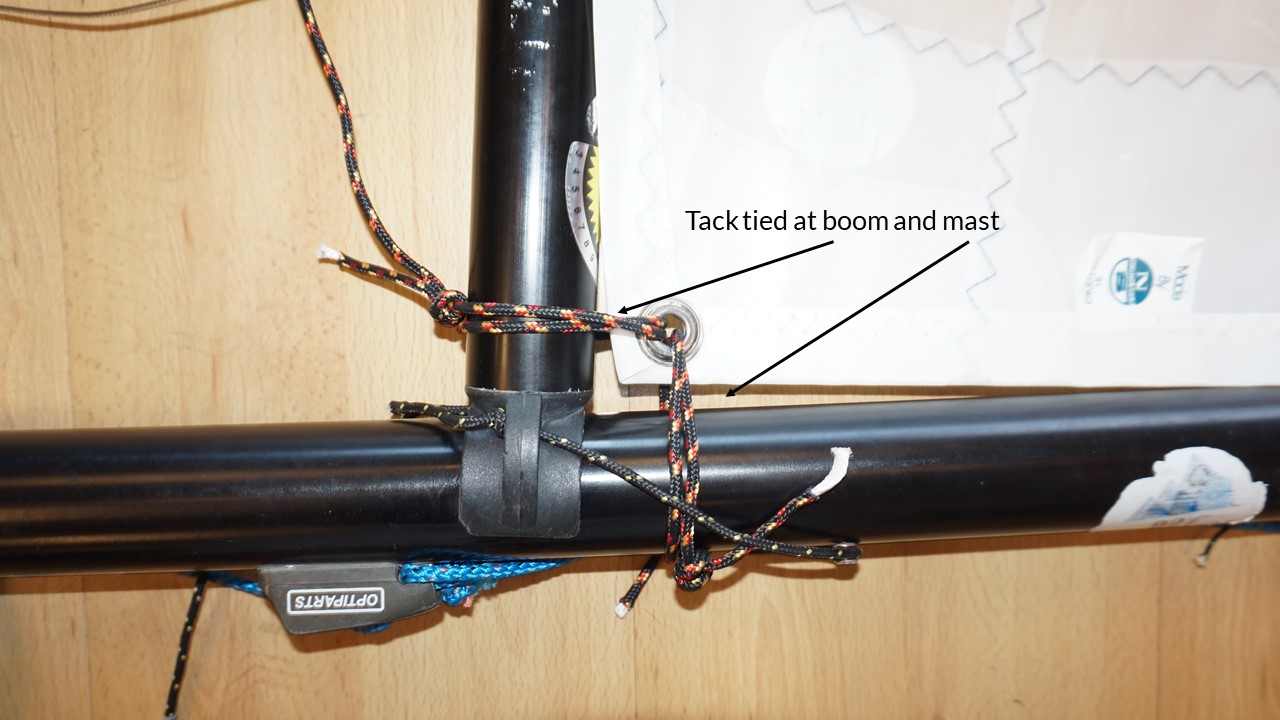
The tack is the forward end of the foot. Attach it to the boom now and then also to the mast when you tie the luff of the sail to the mast.
- Use a 3 mm tie and double wrap it through the tack grommet and the boom as before.
- Adjust the square knot so the foot of the sail just touches the top of the boom at the tack.
- Set the knot.
Tie the Luff of the Sail to the Mast
The mast ties are not “set and forget.” Serious racers adjust the gaps between luff and the mast based on wind conditions. Therefore, it will pay dividends to develop your technique.
The steps below assume you have tied the sail to the boom and are now tying to the mast without pre-existing ties.
Attach boom to mast
- Thread the bottom of the mast through the loop of the boom preventer line and lay it alongside the rolled out sail.
- Make sure the boom preventer button on the mast faces away from the sail.
- Clip the boom fork onto the mast, below the preventer button
Tie the head of the sail
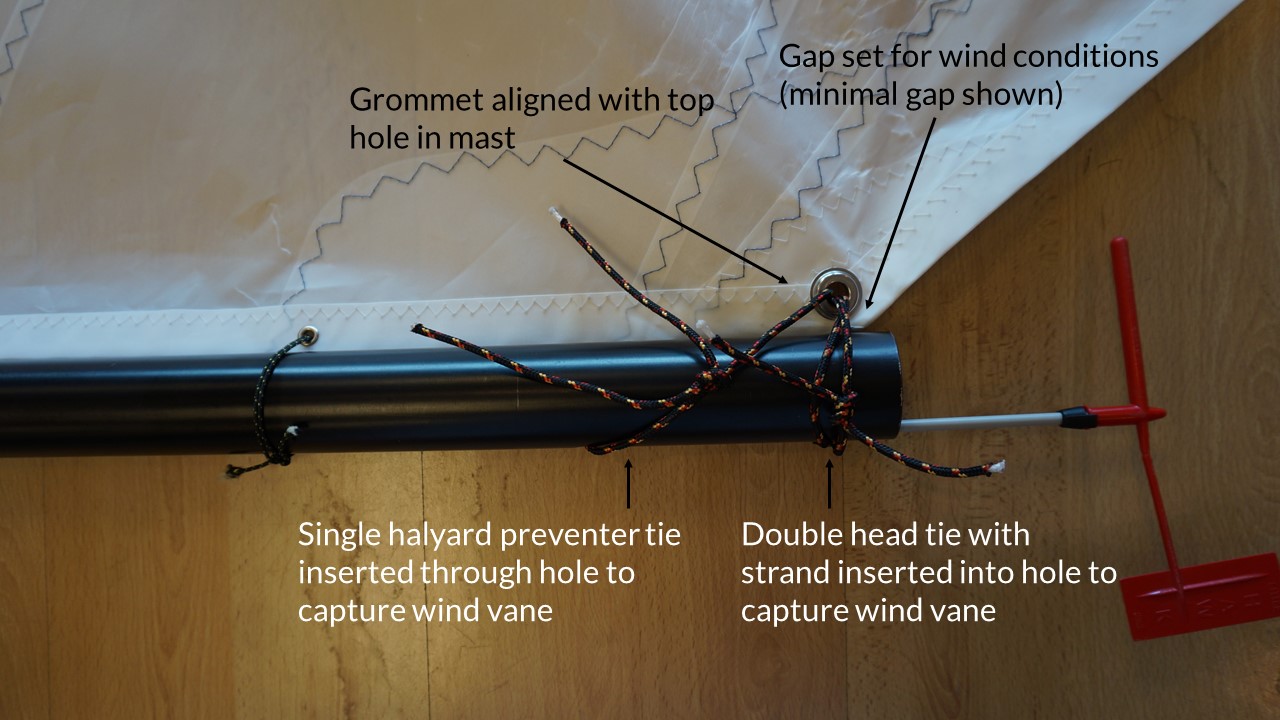
Tie the head first to set the sail measurement line within the bands on the mast.
- Align the grommet at the head of the sail with the top hole in the mast. This alignment puts the sail measurement line within the bands.
- Use a 3 mm corner tie and double wrap it.
- Press one or both strands of the corner tie into the hole on the forward side of the mast and insert the wind vane into the loop.
- Set the gap between the sail and mast according to the table below and tie a square knot.
- Set the square knot by pulling it tight and pulling on the sail.
- Add a half hitch to one end of the square knot for additional security.
Tie the tack
- Tie the tack to the mast using a double-wrapped 3 mm corner tie.
- Adjust the gap according to the table below.
- Set the square knot.
- Add a half hitch to one end of the square knot for additional security.
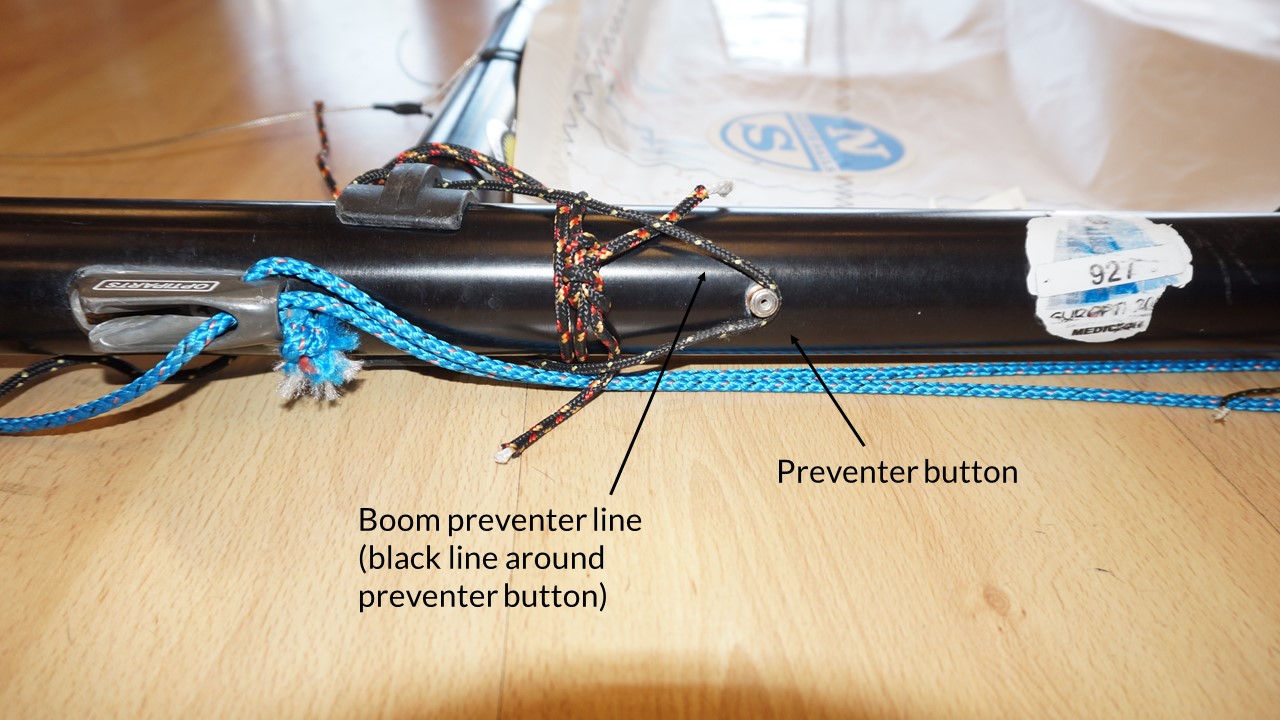
Check the boom preventer
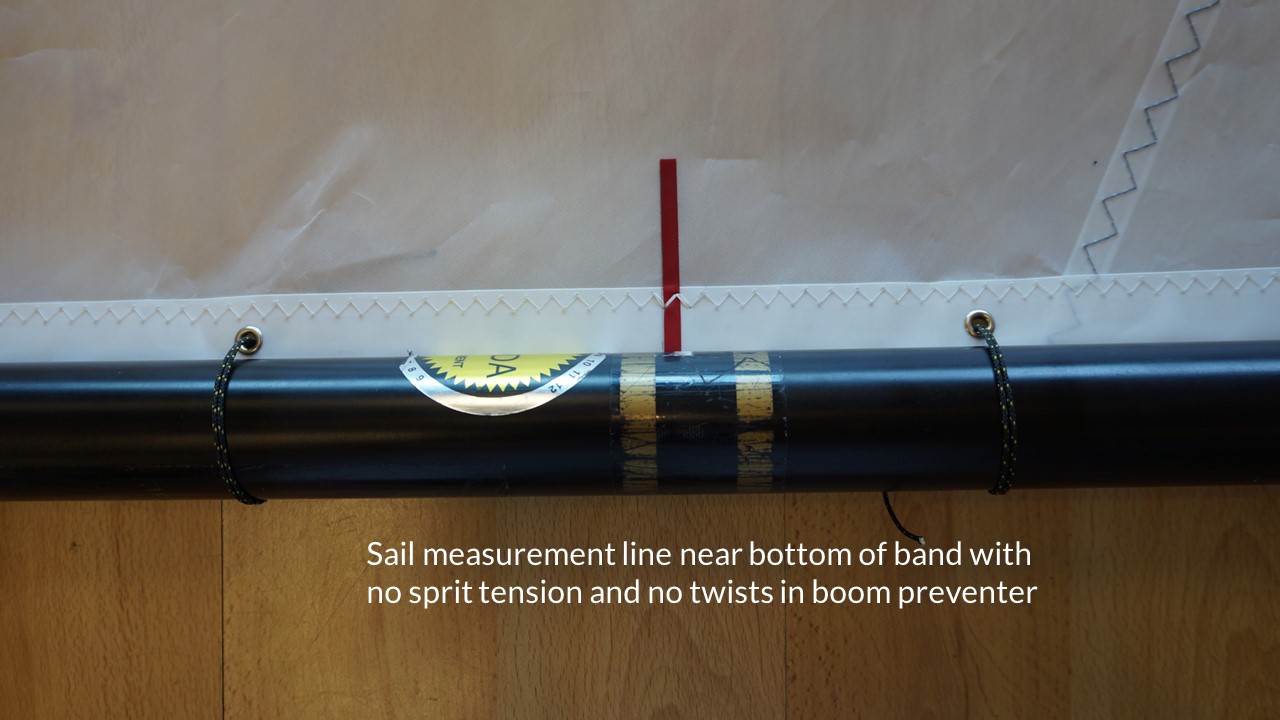
The boom preventer is a line on the boom that prevents the boom from sliding too far down on the mast. This regulates the tension in the luff of the sail. At this point, you want to check the length of the preventer line. Once this length is set, you won’t have to re-adjust it.
Rules note: The sail measurement line must be between the bands when sailing.
- Place the boom preventer line over the mast button without any twists.
- Check that when you push the boom down, the sail measurement line does not go below the lower band on the mast. If needed, shorten the boom preventer line to assure this.
Tie the halyard preventer
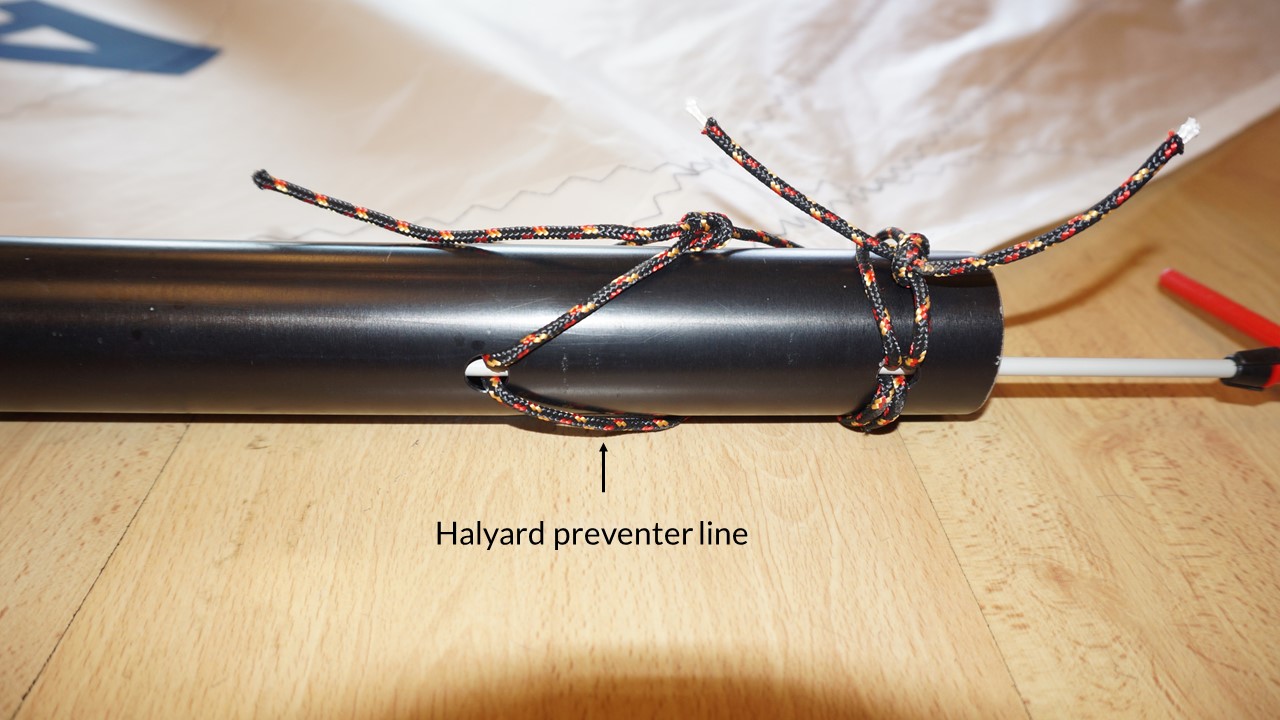
The halyard preventer keeps the sail from being pulled up too far when the sprit is tensioned. You can likely set this once and re-use it even after de-rigging.
- Use a 3 mm corner tie and single wrap it through the grommet and around the mast.
- Press the tie through the second hole on the mast to make a loop.
- Insert the wind vane into the loop.
- Tie a square knot so that the sail band stays below the top measurement band when the sprit is tensioned. Don’t over-tighten the halyard preventer line.
- Set the knot and add a half hitch for additional security if needed.
Tie the luff
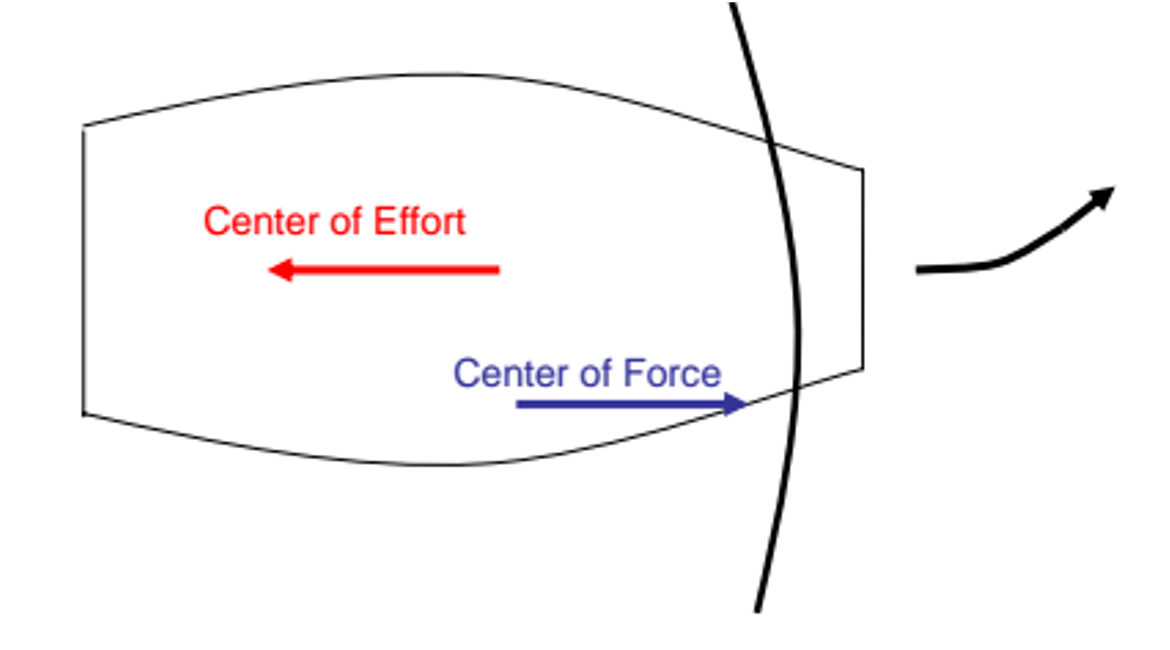
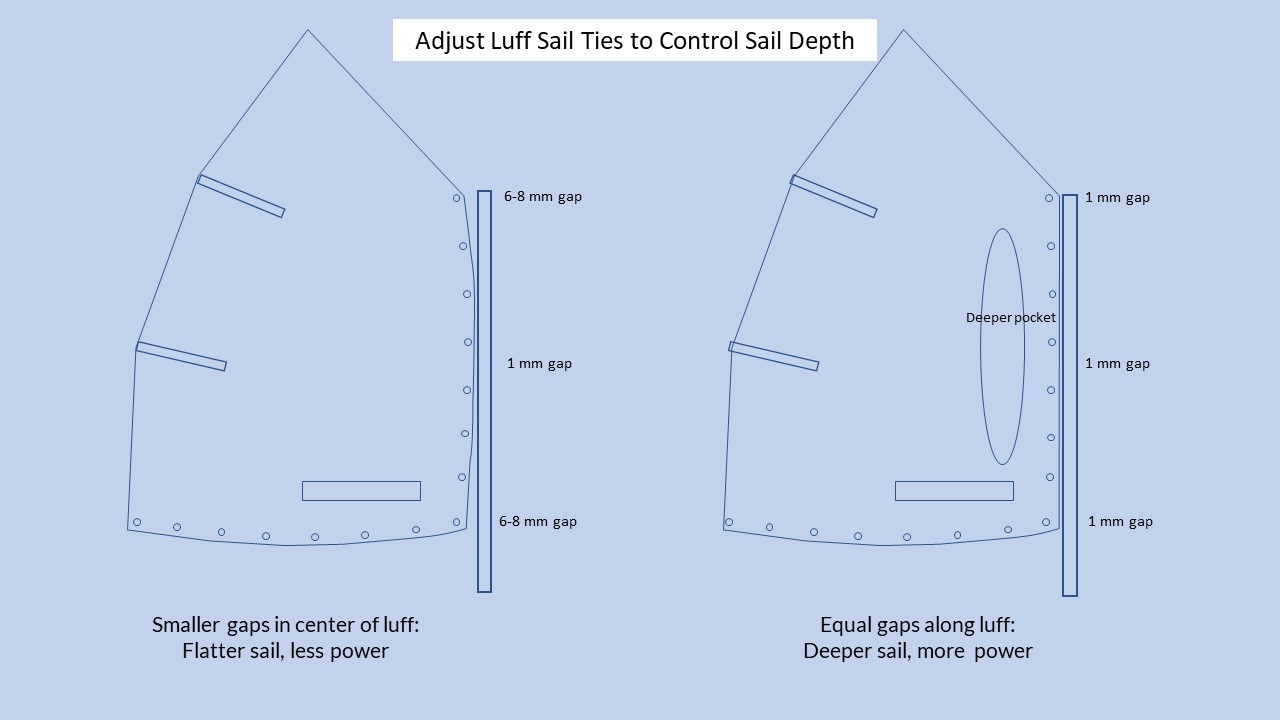
Performance note: Like the foot, the luff of the sail is curved to add depth to the sail. On an Opti, you can regulate this depth by adjusting the gaps between the luff and the mast. The diagram below shows how this works and the typical gap measurements to power up or de-power the sail.
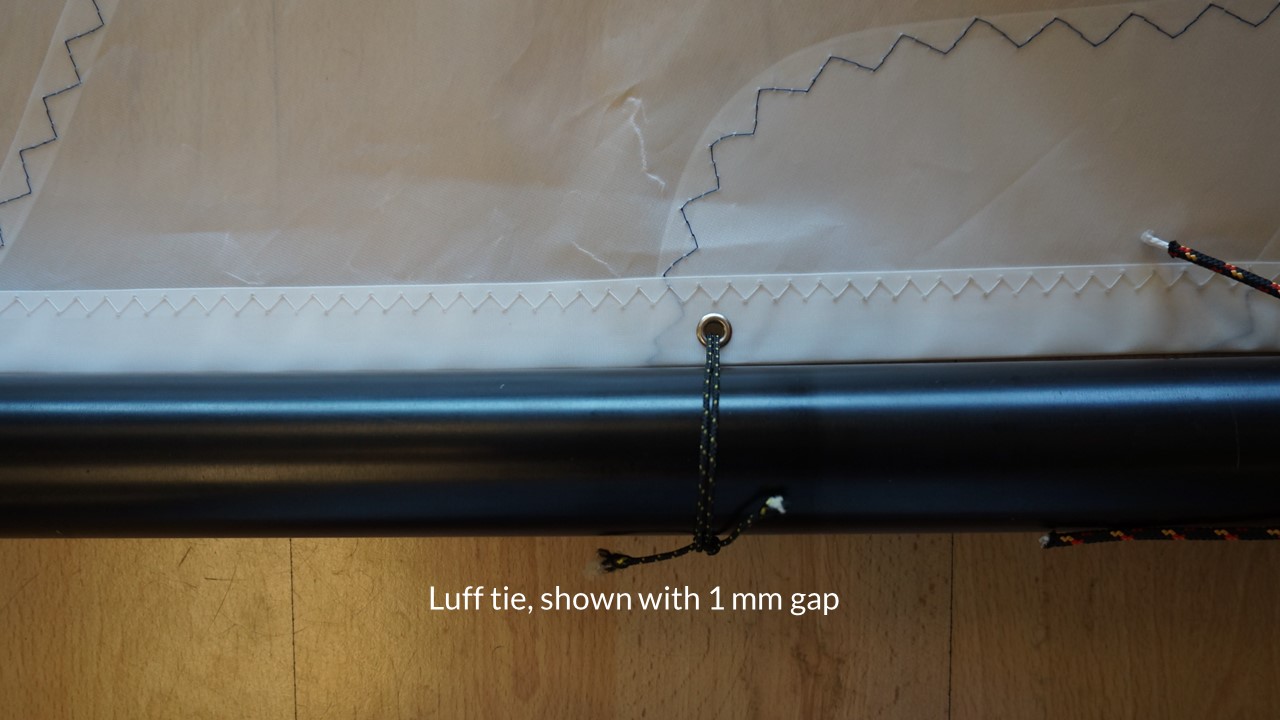
- Use 1.2 mm ties along the luff
- Double wrap the ties through the grommets and around the boom.
- Decide the gaps to use based on conditions and the sailor’s weight and ability.
- Deeper sail, more power: In lighter winds, make the gaps equal (about 1 mm).
- Flatter sail, less power: In heavier winds, or with lighter or less experienced sailors, make the gaps at the top and bottom of the mast larger (perhaps 8 mm) and reduce the gaps gradually to 1 mm as you approach the center.
- Rules note: The maximum gap allowed between the mast and sail is 10 mm.
- Set the square knots by pulling tightly on both ends and pulling up on the sail.
- For additional security, add a half hitch to one end of each square knot.
Travel
For travel or storage. it’s best to remove the sail from the mast and roll it up around the boom.
- Remove the wind vane to free up the head tie and halyard preventer.
- Untie the line from the tack to the mast
- Take the vang out of the cleat
- Unclip the boom fork from the mast
- Slide the mast down towards the foot, leaving the sail ties on the sail.
- Roll the sail on the boom, minimizing creases.
Optimist Sailmakers and Manufacturers Tuning Guides
Optimist Class Rules Link